jubilee

Programing, Books and more...

.gitignoreをあとから適用する

.gitignoreファイルはgit管理対象外とするディレクトリ・ファイルを登録するファイルだが、すでに管理対象として登録されたものに対しては無視される。
すでに管理対象となっているものを、後から.gitginoreに登録し適用させる方法。

例:draftsディレクトリを対象外としたい

下書きディレクトリとして draftsディレクトリ を管理対象としていたが、DropBoxで運用したいのでGit管理からは外したい。

.gitignoreに追記

1
2
# ディレクトリの最後に「/(スラッシュ)」をつける
drafts/

ターミナル

1
2
3
4
5
6
7
8
// --cachedをつけることで、ファイル自体はローカルから削除しない
$ git rm --cached -r drafts/

// ちなみにファイルの場合は以下
$ git rm --cached A.txt

// ローカルからファイルも削除する場合は以下
$ git rm A.txt

Git コミットのメッセージ書き方

Gitではコミットメッセージの形式に関して制約はないが、標準的な形式は以下となる。

  • 1行目にコミットの全体的説明を50字以内で記述
  • 2行目は空行
  • 3行目以降に変更内容の詳細を記述
  • 現在形で記述
1
2
3
4
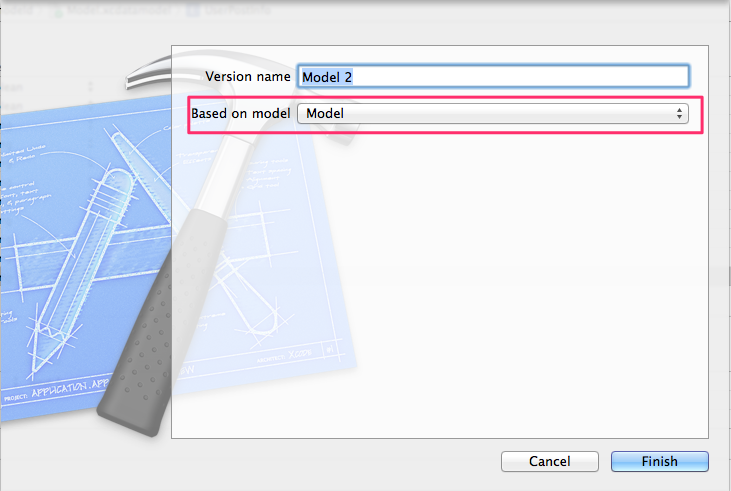
Change the message displayed by hello.py

- Update the sayHello() function to output the user's name
- Change the sayGoodbye() function to a friendlier message

参考

https://www.atlassian.com/ja/git/tutorial/git-basics#!commit

ディレクトリ内を検索し、対象の文字列を含むディレクトリ・ファイルを削除

~/tmpディレクトリ内に存在する「capture」の文字列を含むディレクトリ・ファイルを削除したい。
ワイルドカードが使えないみたいなので、以下で対応。

1
2
3
4
5
6
7
8
9
10
11
12
13
14
15
16
17
18
- (void)deleteTmpCaptureDir
{
    NSFileManager *manager = [NSFileManager defaultManager];
    NSError *error = nil;
    // ~/tmpディレクトリの取得
    NSString *tmpDir = NSTemporaryDirectory();
    // tmpディレクトリ内の一覧取得
    NSArray *list = [manager contentsOfDirectoryAtPath:tmpDir error:&error];
    // 一覧の中から「capture」を含むディレクトリ・ファイルを検索
    for (NSString *path in list) {
        NSRange range = [path rangeOfString:@"capture"];
        // 存在したならば削除
        if (NSNotFound != range.location) {
            NSString *target = [tmpDir stringByAppendingPathComponent:path];
            [manager removeItemAtPath:target error:&error];
        }
    }
}

1つの画面の上下で同じViewControllerを使う方法(addChildViewController)

  • 1つの画面(A-ViewController)の上下にImageViewとスライダーを表示し、 同じ処理をさせる必要があった
  • 画面上に2つずつUIImageViewとUISliderを配置して制御してもいいけど、同じことするのは面倒
  • 同じ処理なので1つのViewController(UIImageViewとUISliderを持った)を作成(MovieVCとする)
  • 大元の画面(A-ViewController)で、上下に作成したMovieVCを呼べばいいのでは?
  • Container ViewController?

UIActionSheetでタップされたボタンのタイトルを取得する

UIActionSheetで、タップされたボタンのタイトルを取得する方法。

1
2
3
4
5
6
7
8
- (void)actionSheet:(UIActionSheet *)actionSheet clickedButtonAtIndex:(NSInteger)buttonIndex
{
    // キャンルボタンかどうかの判断(おまけ)
    if (buttonIndex != actionSheet.cancelButtonIndex) {
        // タップされたボタンのタイトルを取得
        _label.text = [actionSheet buttonTitleAtIndex:buttonIndex];
    }
}

CoreDataのマイグレーション(その1)

CoreDataを使ったアプリで、リリース後にエンティティに属性を追加したい場合の対応方法。
もちろん、今のデータを保持したままマイグレーションさせるのが前提。

  • MagicalRecord使用済み
  • アプリリリース後にエンティティに属性を追加する
  • 当然、今保存されているデータは引継がれることが前提

MagicalRecord

セットアップ部分。
AppDelegate.m

1
2
3
4
5
6
7
- (BOOL)application:(UIApplication *)application didFinishLaunchingWithOptions:(NSDictionary *)launchOptions
{
    ...
    // .xcdatamodelがプロジェクト名と違うし、自動マイグレーションしてほしい(最初から設定済み)
    [MagicalRecord setupCoreDataStackWithAutoMigratingSqliteStoreNamed:@"Model.sqlite"];
    ...
}

どのセットアップメソッドを使用するか

ここを参考:http://www.raywenderlich.com/56879/magicalrecord-tutorial-ios

CoreDataを作成した際の {任意の名前}.xcdatamodel が、プロジェクト名と同じであれば

  • setupCoreDataStack
  • setupCoreDataStackWithInMemoryStore
  • setupAutoMigratingCoreDataStack

違うならば

  • setupCoreDataStackWithStoreNamed:
  • setupCoreDataStackWithAutoMigratingSqliteStoreNamed:

AutoMigrating がついている方は、属性追加などをした際に可能であれば自動でマイグレーションしてくれる。

Xcode

Modelのバージョンを追加

{任意の名前}.xcdatamodel を選択し、Editor –> Add Model Version…
Model Version

Model2

新しく追加したModelに属性を追加

新しく追加した方のモデル(Model2)に属性を追加する。

Current Versionの変更

  • Model.xcdatamodeledを選択する
  • File inspectorを選択し、Model Version -> Current で、追加した方(Model2)を選択する
  • Model2.xcdatamodeledにチェックマークがつく

changeVersion

属性名の変更など

属性名の変更などについては、Lightweightマイグレーションという手法を使用するらしい(未検証) 。
また、マッピングモデルを使ったマイグレーションも存在するらしい(未検証)。

参考

キーボードの上に閉じるボタンを表示する(inputAccessoryView)

UITextViewなどでキーボードを閉じたい時に、キーボードの上部に閉じるボタンを追加して閉じる方法。
inputAccessoryViewといって、キーボード上部にボタンなどを配置できる。
キーボードの表示/非表示に合わせて、表示/非表示される。

生成

1
2
3
4
5
6
7
8
9
10
11
12
13
14
15
16
17
18
19
20
21
22
23
24
- (void)viewDidLoad
{
...

    // ボタンを配置するUIViewを作成(幅320/高さ44・背景色:透明)
    UIView* accessoryView =[[UIView alloc] initWithFrame:CGRectMake(0, 0, 320, 44)];
    accessoryView.backgroundColor = [UIColor clearColor];

    // ボタンを作成(accessoryView内で、X:270 Y:5 Width:40 Height:30にイメージ有りボタン)
    UIButton* closeButton = [UIButton buttonWithType:UIButtonTypeCustom];
    [closeButton setImage:[UIImage imageNamed:@"hideKeyboard"] forState:UIControlStateNormal];
    closeButton.contentMode = UIViewContentModeScaleAspectFit;
    closeButton.frame = CGRectMake(270, 5, 40, 30);
    // ボタンタップ時のメソッドを指定(closeKeyboard: → 自作メソッド)
    [closeButton addTarget:self action:@selector(closeKeyboard:) forControlEvents:UIControlEventTouchUpInside];

    // ボタンをViewに追加
    [accessoryView addSubview:closeButton];

    // ビューをUITextFieldのinputAccessoryViewに設定
    _textView.inputAccessoryView = accessoryView;

...
}

ボタンタップ時の処理

Closeボタン実行時の処理も記述する。

1
2
3
4
-(void)closeKeyboard:(id)sender
{
    [self.view endEditing:YES];
}

関連

UITextView関連では、以下もあり。
http://mzgk.github.io/blog/2014/uiscrollview-tapevent/

セルに追加したボタンの処理をViewControllerで行う

カスタムセルに追加したボタンの処理を、ViewControllerで行う方法。
タップされたボタンのセルのインデックスの取得。

Cell

  1. StoryBoard上でセル内にボタンを追加する
  2. Attribute inspector – view – Tag に値を設定する
  3. Outlet接続のみ行う(不要かも)

ViewController

ボタンのプロパティを宣言

1
@property (weak, nonatomic) UIButton *button;

ボタンとタップ時の処理を作成する

任意の場所で。

1
2
3
4
// Cellにボタンを設定した時のTag値
_button = (UIButton*)[cell viewWithTag:1];
// ボタンのイベントを登録
[_button addTarget:self action:@selector(buttonTapped:event:) forControlEvents:UIControlEventTouchUpInside];

タップ時の処理

1
2
3
4
5
6
7
8
9
- (void)buttonTapped:(id)sender event:(UIEvent*)event
{
    // タップされたボタンのセルインデックスを取得する
    UITouch *touch = [[event allTouches]anyObject];
    CGPoint point = [touch locationInView:_sampleTableView];
    _tappedIndexPath = [_sampleTableView indexPathForRowAtPoint:point];

    // 実行したい処理
}

参考

指定したセルの表示更新を行う

特定のセルのみの表示更新を行いたい場合の方法。
以下のようなパターンで必要になった。

  1. セルをスワイプして削除ボタンを表示し、削除ボタンをタップ
  2. セル内のデータに基づく内部データを処理(セル自体は削除したくない)
  3. 削除ボタンが消せない(reloadData)
  4. セルのみ更新をしたい
1
2
3
4
5
6
7
8
9
10
11
12
- (void)tableView:(UITableView *)tableView commitEditingStyle:(UITableViewCellEditingStyle)editingStyle forRowAtIndexPath:(NSIndexPath *)indexPath
{
    if (editingStyle == UITableViewCellEditingStyleDelete) {
        // セルの削除ボタンでしたい処理
        ...
        // 処理したセルの更新↓↓↓
        NSArray *indexPaths = [NSArray arrayWithObject:indexPath];
        [self.tableView reloadRowsAtIndexPaths:indexPaths withRowAnimation:UITableViewRowAnimationRight];
        // ↑↑↑
    } else if (editingStyle == UITableViewCellEditingStyleInsert) {
    }
}

更新時のアニメーション

  • UITableViewRowAnimationFade
  • UITableViewRowAnimationRight
  • UITableViewRowAnimationLeft
  • UITableViewRowAnimationTop
  • UITableViewRowAnimationBottom
  • UITableViewRowAnimationNone
  • UITableViewRowAnimationMiddle

UIImageView内に表示する画像の表示モード

UIImageView内に表示する画像の表示モードを指定する方法。

指定方法

1
_imageView.contentMode = UIViewContentModeCenter;

モード

1
2
3
4
5
6
7
8
9
10
11
12
13
14
15
typedef NS_ENUM(NSInteger, UIViewContentMode) {
    UIViewContentModeScaleToFill,
    UIViewContentModeScaleAspectFit,      // contents scaled to fit with fixed aspect. remainder is transparent
    UIViewContentModeScaleAspectFill,     // contents scaled to fill with fixed aspect. some portion of content may be clipped.
    UIViewContentModeRedraw,              // redraw on bounds change (calls -setNeedsDisplay)
    UIViewContentModeCenter,              // contents remain same size. positioned adjusted.
    UIViewContentModeTop,
    UIViewContentModeBottom,
    UIViewContentModeLeft,
    UIViewContentModeRight,
    UIViewContentModeTopLeft,
    UIViewContentModeTopRight,
    UIViewContentModeBottomLeft,
    UIViewContentModeBottomRight,
};